
Heroku란?
Heroku는 Java, Node.js, Python등 여러 언어를 지원하는 클라우드 Paas(Platform as a Service)이다.
나는 m1맥북을 쓰고 있으므로 m1에 맞추어 환경 설정을 해야한다.
- rosetta를 사용하여 iterm 실행
- rosetta 버전 brew 설치
- 이미 brew가 일반 터미널에 있더라도 설치한다. (which brew)로 확인하면 /opt/homebrew/bin/brew 로 표시된다면 설치한 적이 있는 것이다.
- rosetta터미널에서 brew를 설치한다
/bin/bash -c "$(curl -fsSL https://raw.githubusercontent.com/Homebrew/install/HEAD/install.sh)" - rosetta 버전 brew를 alias지정해준다
alias rbrew='/usr/local/bin/brew' - 이제 두 개의 brew가 설치된 것을 확인 할 수 있다.
❯ which brew /opt/homebrew/bin/brew ❯ which rbrew rbrew: aliased to /usr/local/bin/brew
- heroku 설치
rbrew tap heroku/brew && rbrew install heroku
https://devcenter.heroku.com/articles/getting-started-with-nodejs#set-up
Getting Started on Heroku with Node.js | Heroku Dev Center
This tutorial will have you deploying a Node.js app to Heroku in minutes. Hang on for a few more minutes to learn how to get the most out of the Heroku platform. In this step you’ll install the Heroku Command Line Interface (CLI). You use the CLI to mana
devcenter.heroku.com
1. heroku cli에서 로그인 하기
heroku login
heroku: Press any key to open up the browser to login or q to exit
 ›   Warning: If browser does not open, visit
 ›   https://cli-auth.heroku.com/auth/browser/***
heroku: Waiting for login...
Logging in... done
Logged in as me@example.comheroku 홈페이지에서 회원가입을하고 heroku login 명령어를 터미널에 입력하면 위와같이 진행되며 로그인 되었다는 브라우저가 켜진다.
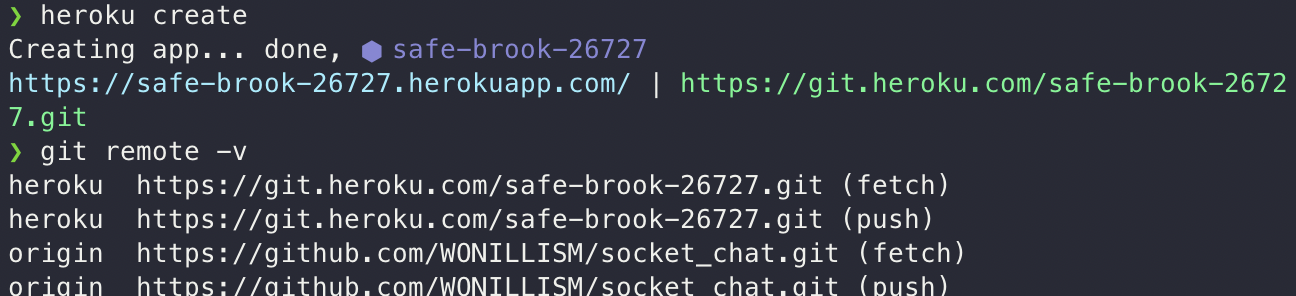
2. 앞서 만들었던 socket.io 기본 채팅을 푸시 해보자. 해당 리포지토리로 이동한 후 heroku create를 입력
3. 코드 배포

heroku open을 해보앗지만 아래와 같은 에러가 났다.

기존 코드는 아래와 같은데 heroku에 배포하기 위해 조금 수정해주어야 한다.
const express = require("express");
const app = express();
const http = require("http");
const server = http.createServer(app);
const { Server } = require("socket.io");
const io = new Server(server);

app.get("/", (req, res) => {
  res.sendFile(__dirname + "/index.html");
});

io.on("connection", (socket) => {
  socket.on("chat message", (msg) => {
    io.emit("chat message", msg);
  });
  // console.log('a user connected');
});

server.listen(3000, () => {
  console.log("listening on *:3000");
});const express = require("express");
const app = express();
const path = require("path");
const PORT = process.env.PORT || 3000;
const http = require("http");
const server = http.createServer(app);
const { Server } = require("socket.io");
const io = new Server(server);
app.get("/", (req, res) => {
res.sendFile(__dirname + "/index.html");
});
io.on("connection", (socket) => {
socket.on("chat message", (msg) => {
io.emit("chat message", msg);
});
// console.log('a user connected');
});
server.listen(PORT, () => {
console.log(`listening on ${PORT}`);
});heroku server에 환경변수 설정을 해야하므로 위와 같이 코드 수정이 필요하다.